Table of Contents
This is for all those Hario Mini Mill lovers who are curious how to make their hand grinder significantly more consistent by using simple mods to the rod and outer burr.
If you’re not an owner of this fantastic hand grinder, check out its review!
UPDATE: The new Hario Mini Slim resolves a lot of the issues that this mod guide used to resolve. While this mod will still work for older grinder models, I largely just recommend upgrading to the new, far-better version 🙂
Back to the Hario grinder mod guide!
The Problem: Achieving a Consistent Grind Size
It’s no secret that the Mini Mill doesn’t exactly compete with a commercial electric grinder, but this little guy is definitely good enough for most people.
There is one problem however: grind consistency.
Consistent coarse grind size tends to be fairly inconsistent with many different sized grounds.
This problem is a result of two pieces, the metal rod and the outer burr, not being set in their places firmly enough. This enables some wiggling, which ends in unevenly ground coffee.
The Solution: Scotch Tape
The solution is so simple you will doubt it: scotch tape. Yes, those clear strips are the key to the Hario Mini Mill mod.
Step 1: Disassemble Your Hario Mini Mill
Before we apply tape, disassemble your hand grinder and clean it well.
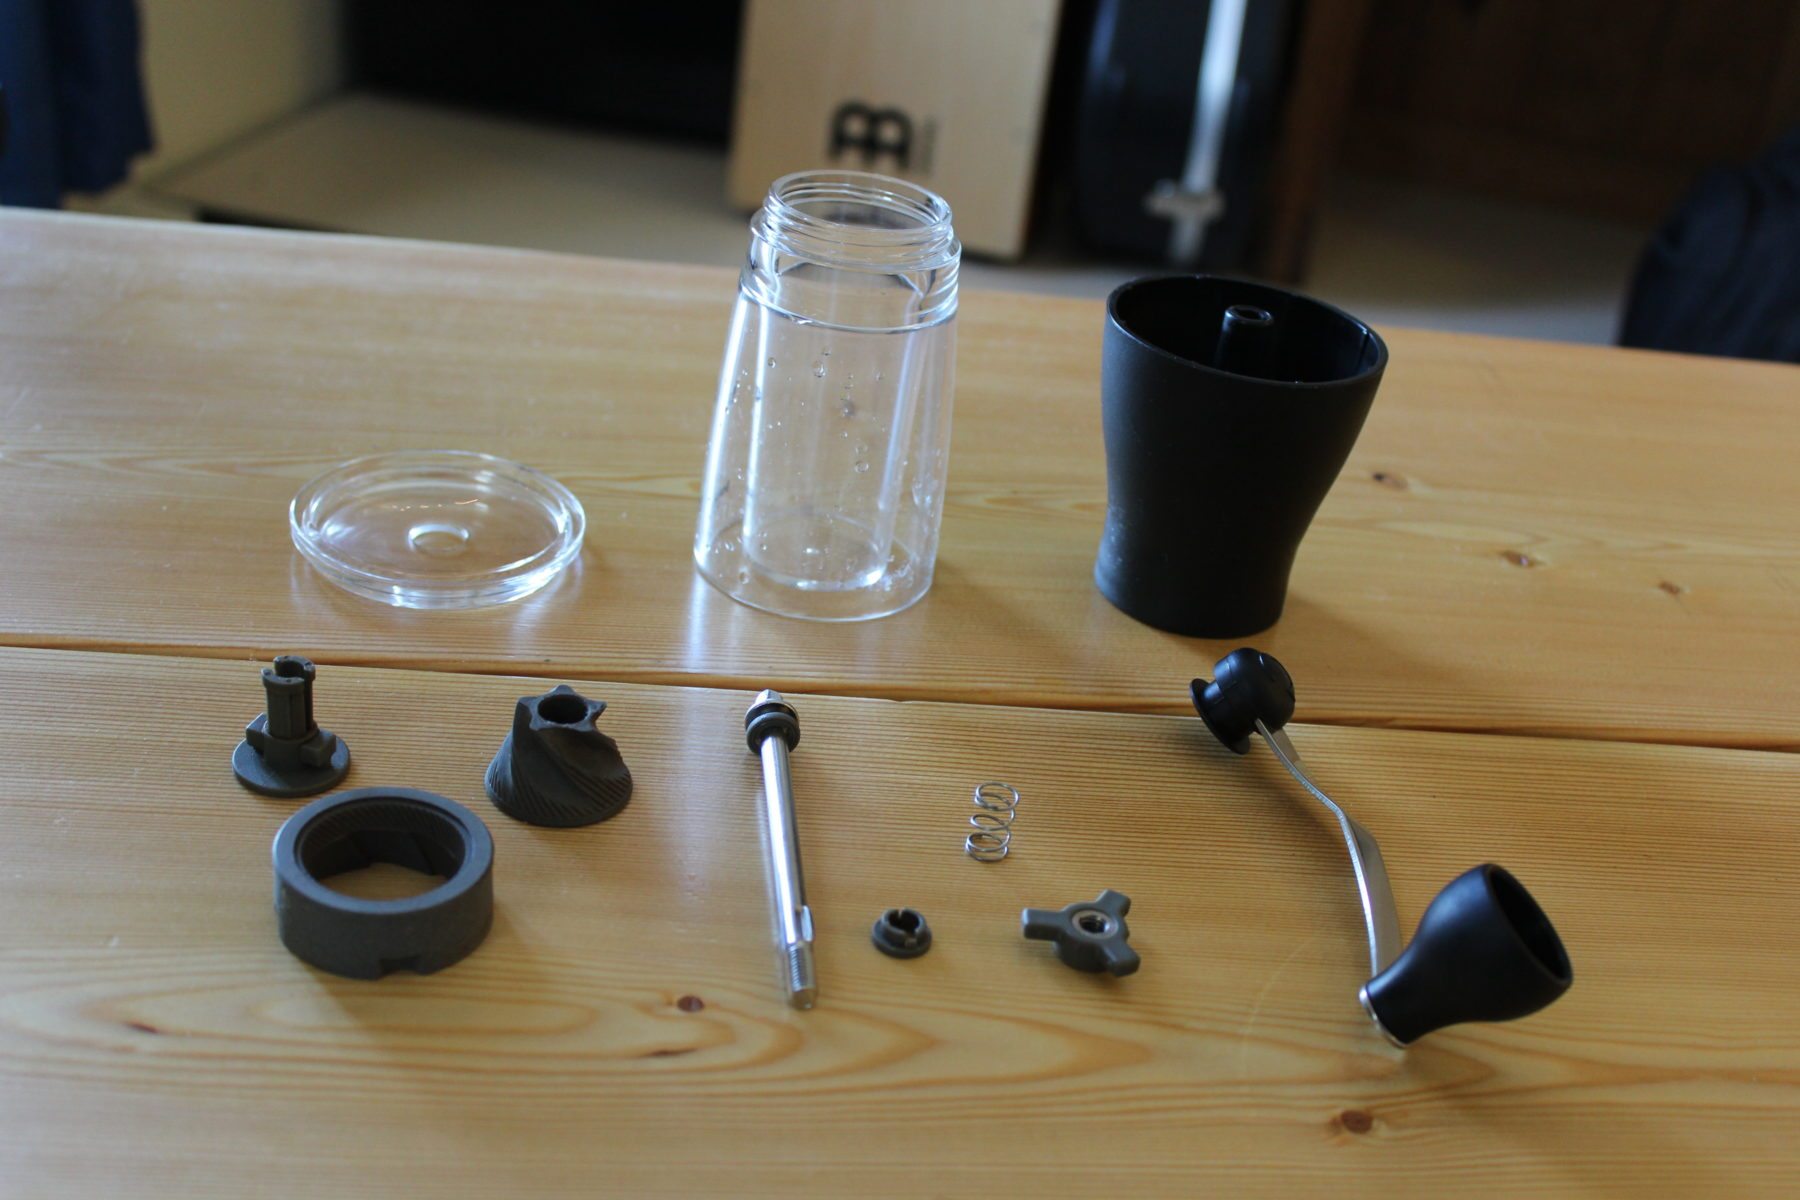
Don’t use water on any of the ceramic pieces, it could shorten the grinder’s life. I just use a paper towel and little brush to get small particles off.
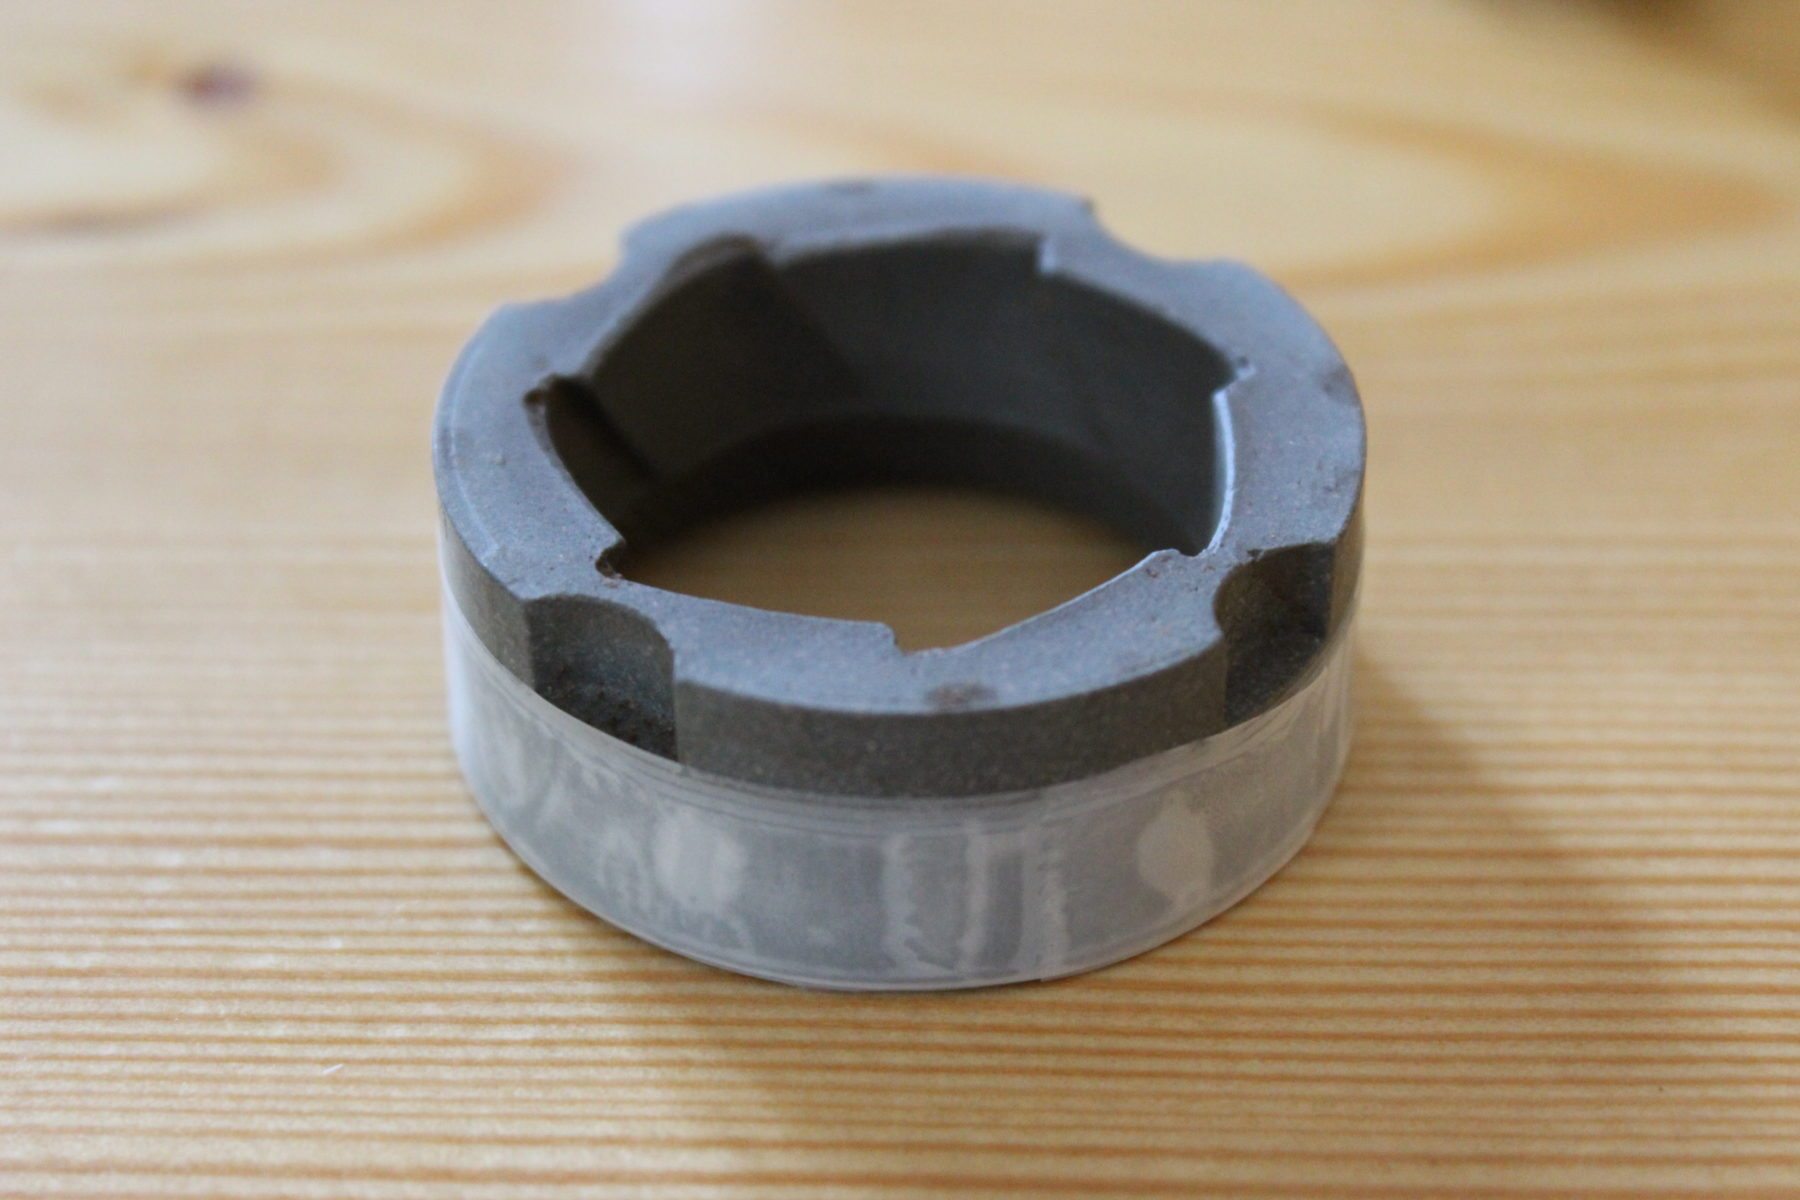
The two pieces you’ll need for this modification are:
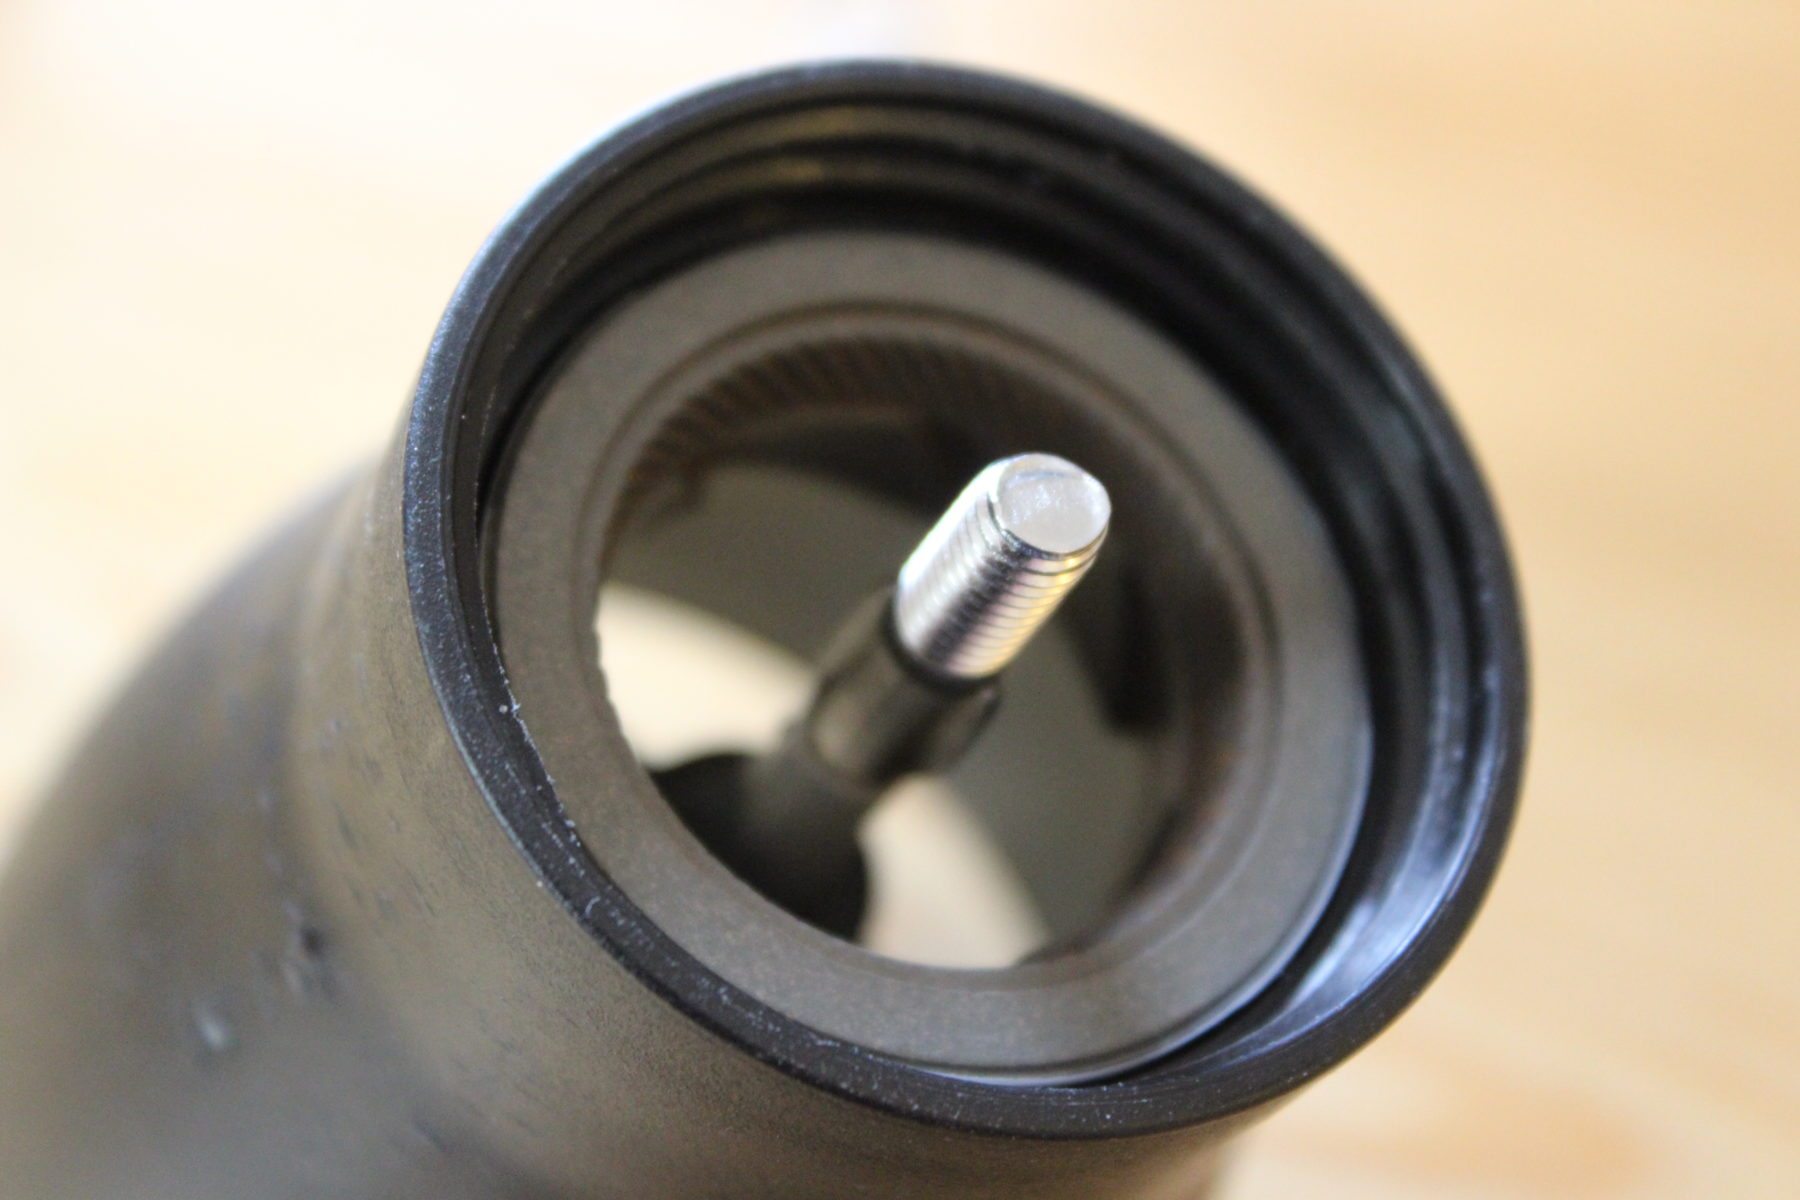
- the long metal rod
- the outer burr (the large ceramic ring)
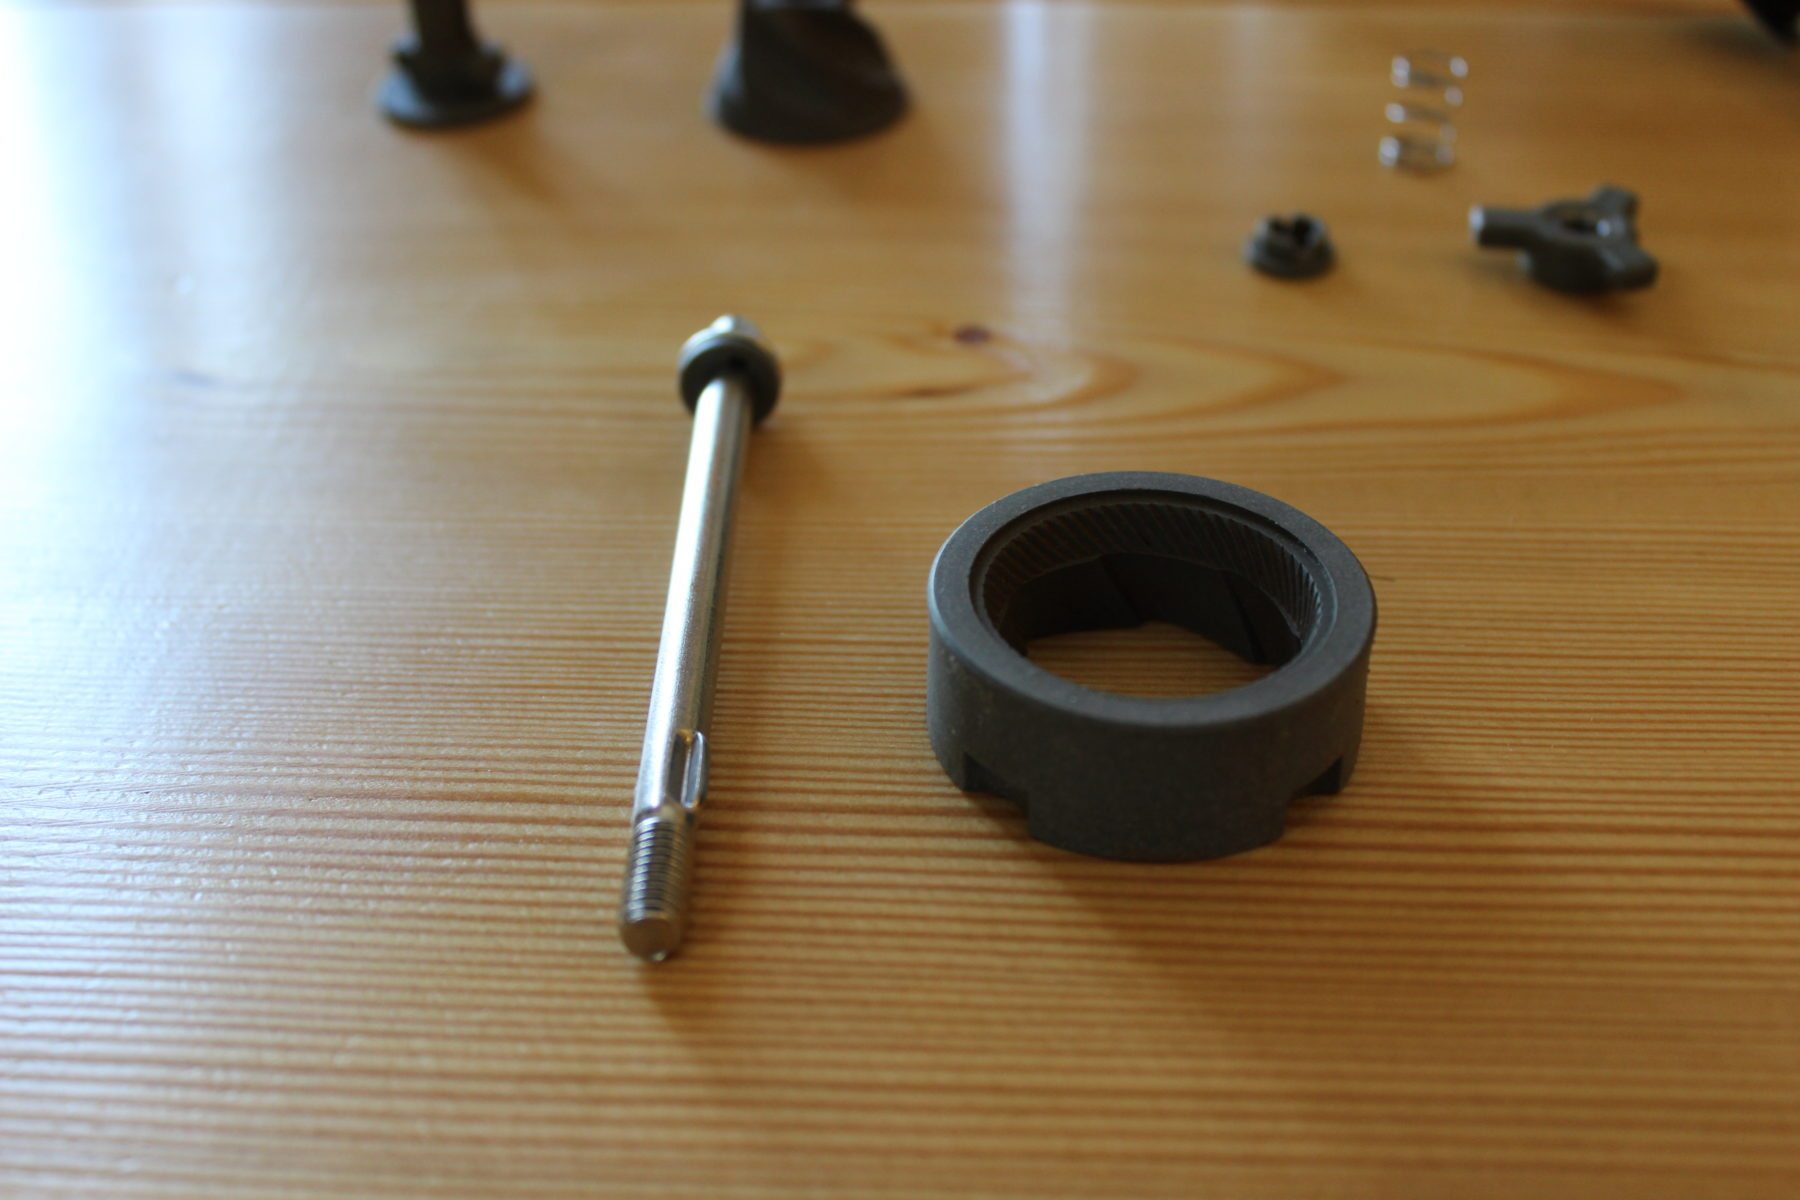
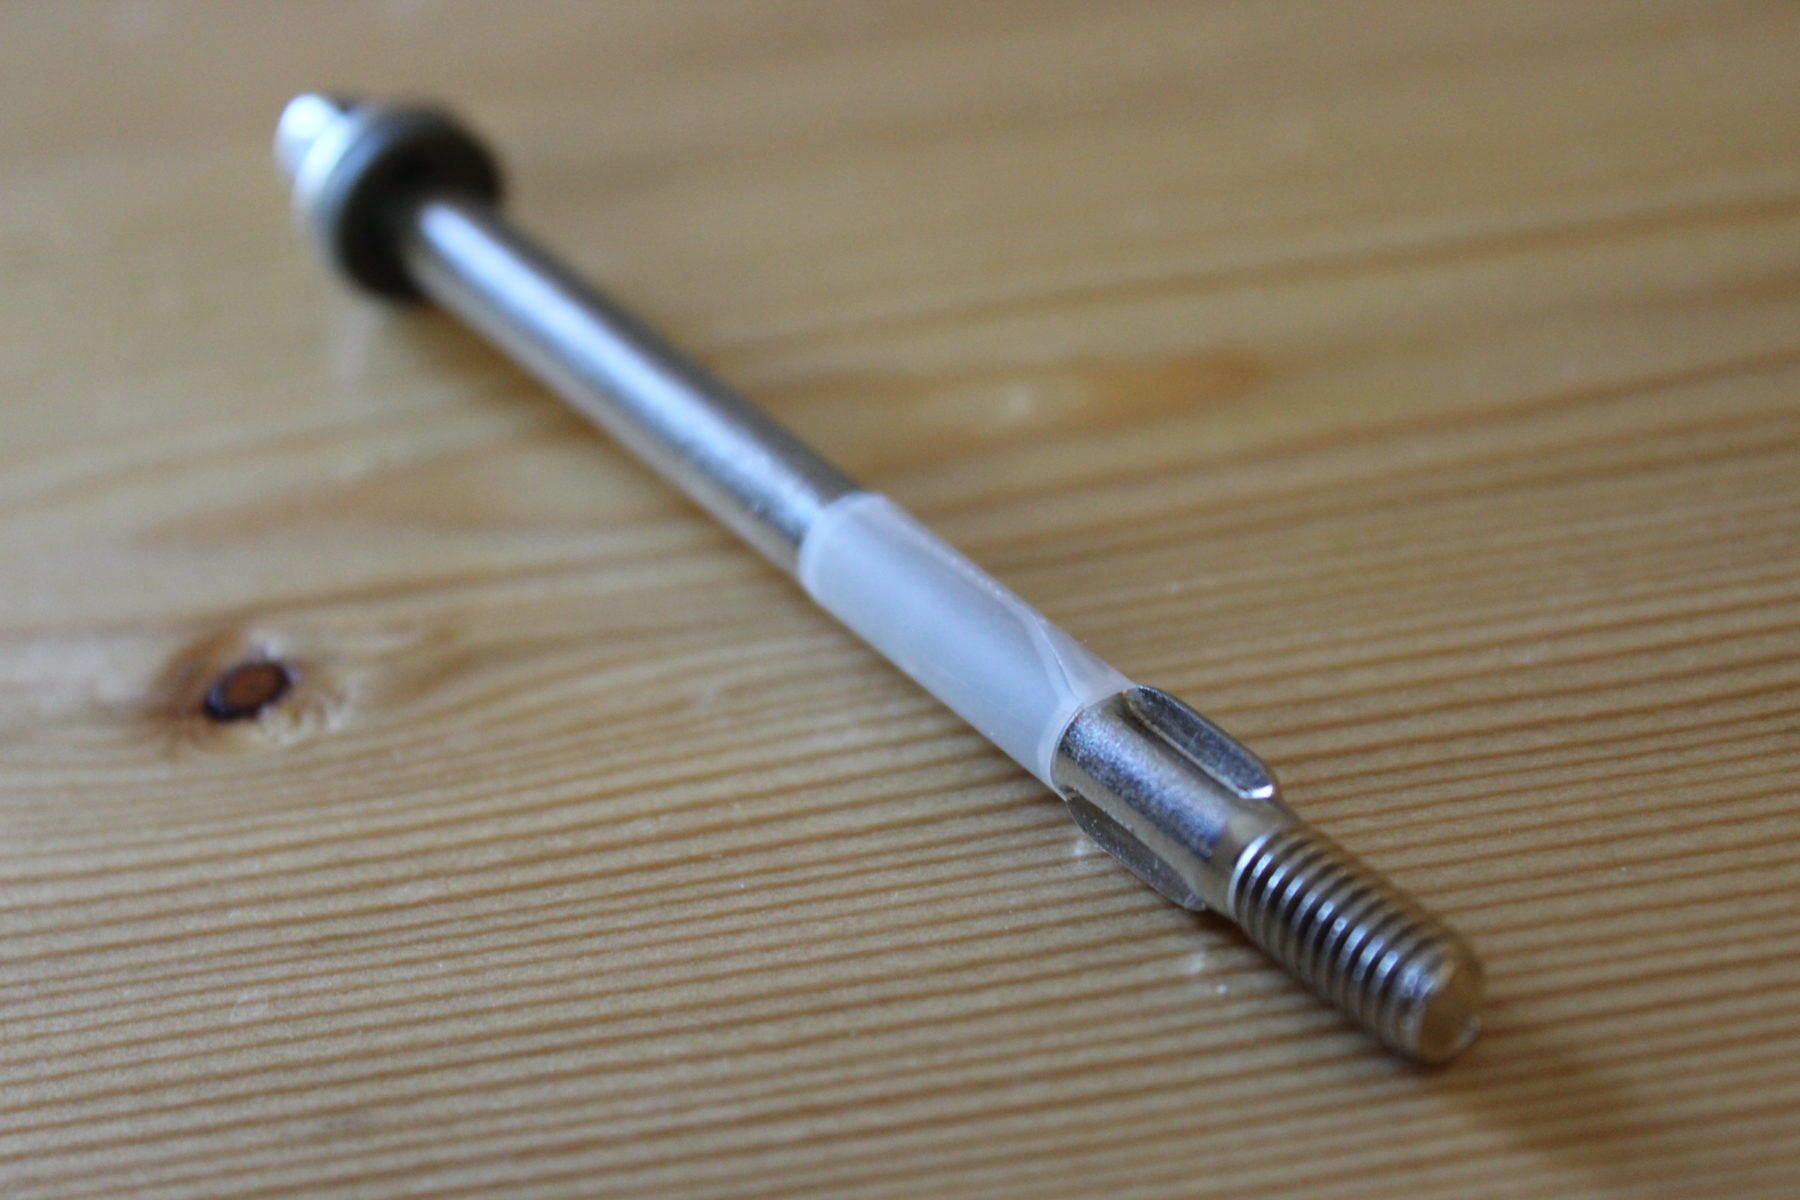
Step 2: The Metal Rod Mod
This part is fairly simple. Right above the screw portion of the rod are two small protrusions on either side. Just above this is where the tape is going around the rod. Put just enough on so that the rod can fit through the black hopper and spring, but be set firmly. I used about four layers of tape, but experiment yourself to find the best fit.
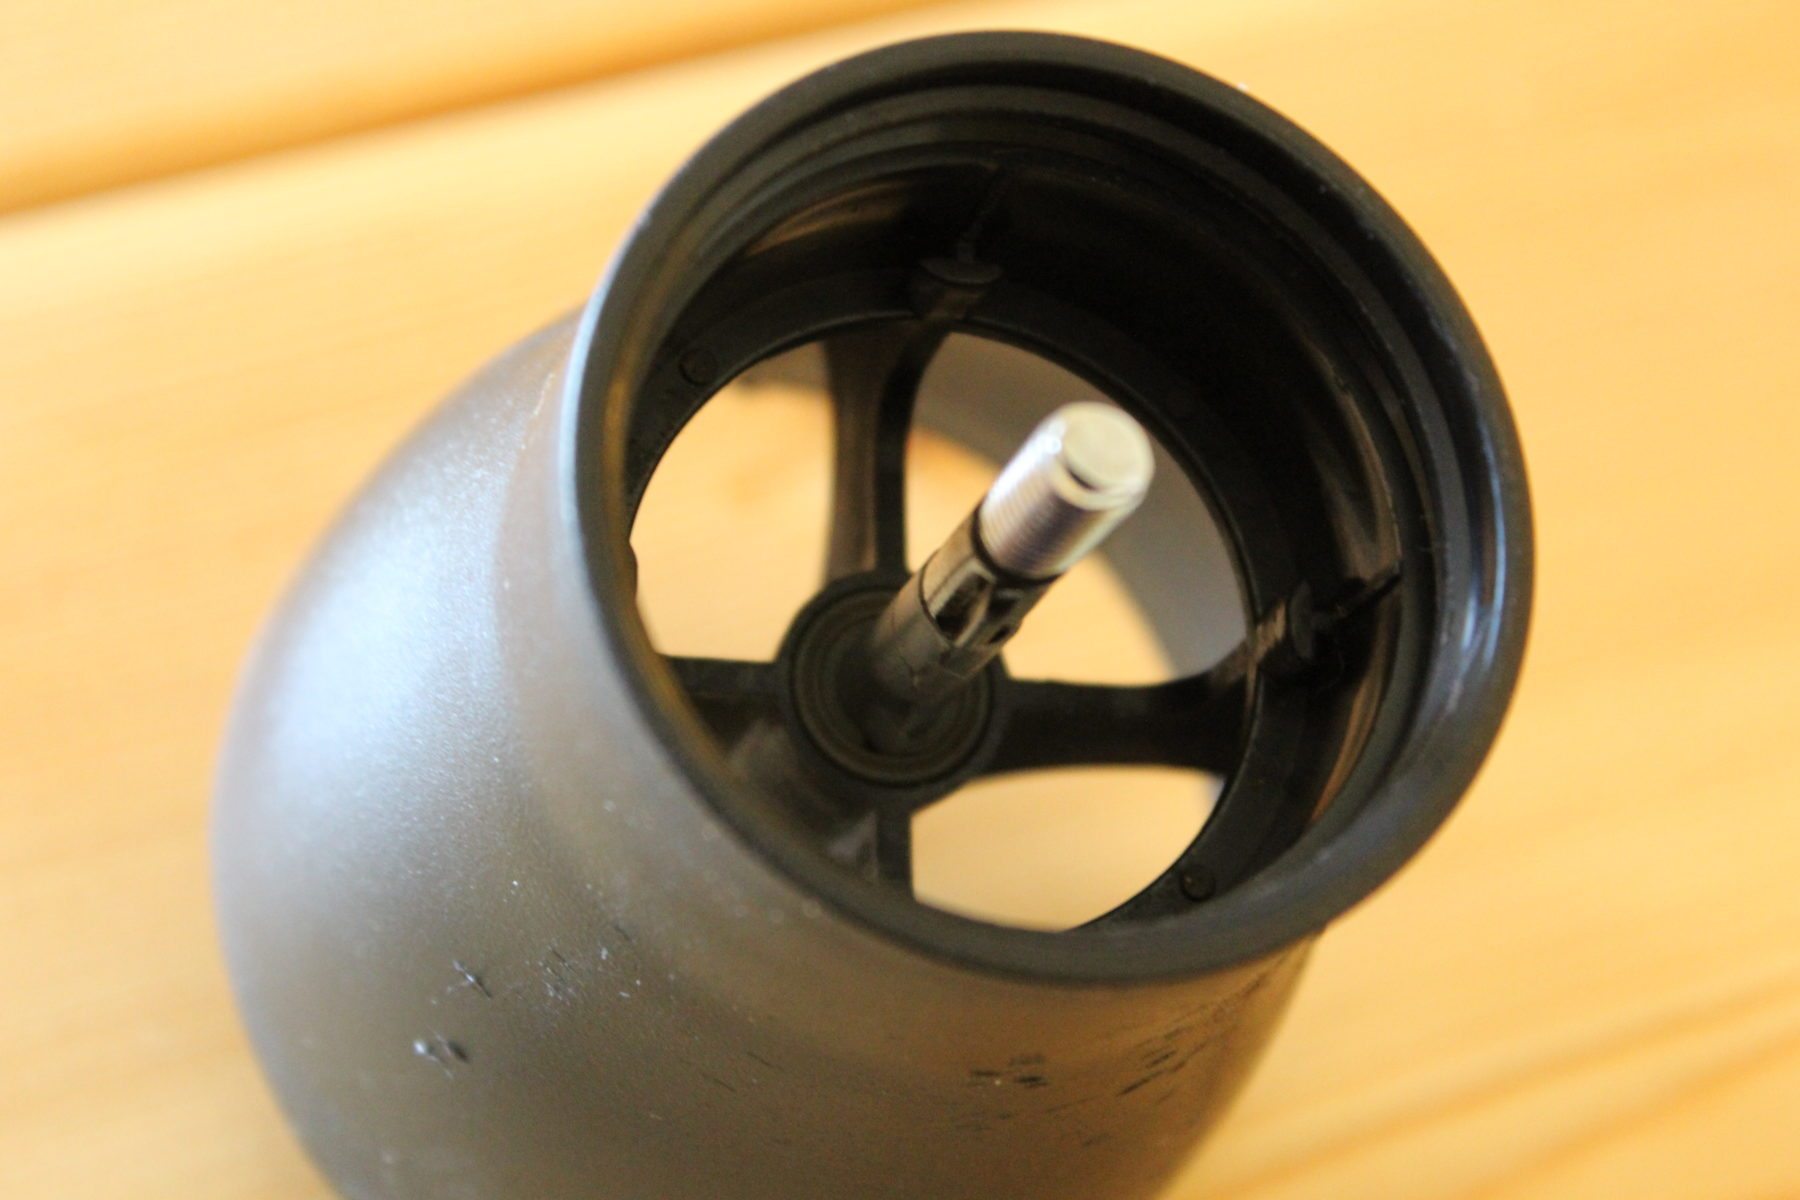
Once you’ve done that, place it back through the tunnel and attach the pieces that hold it in place. You should be able to notice much less wiggling.
Step 3: The Outer Burr Mod
This part is a little more difficult.
Split a piece of tape into two long strips using scissors. Make sure not to cover the indentions where the burr and body meet. Take your time and try not to allow lots of tape going over the edges. Here I used three layers.
After you’ve applied this mod, settle it back into the bottom of the body and confirm that the wiggling has decreased immensely. If not, apply another layer of tape. As before, experiment!
Step 4: Reassemble your Hario grinder
After reassembling you’ll notice that the coffee grounds are much more consistent, especially when you’re grinding coarsely.
And that’s the Hario Mini Mill mod!
Modded Mini Mill vs Non-Modded Mini Mill Grind Comparison
Skeptical of this mod using extremely simple materials? I completed a side-by-side comparison of the grind uniformity of a modded Mini Mill vs a non-modded Mini Mill and recorded my results. Check out the Hario Mini Mill Mod Grind Comparison!
Note* My access to resources and technologies (micron filters and such) that could measure the effectiveness of the modification using standard scientific measurements is non-existent. As a result, these results are based on eyesight and feel.
Below is a brief summary.
Grind Setting: 5 Clicks
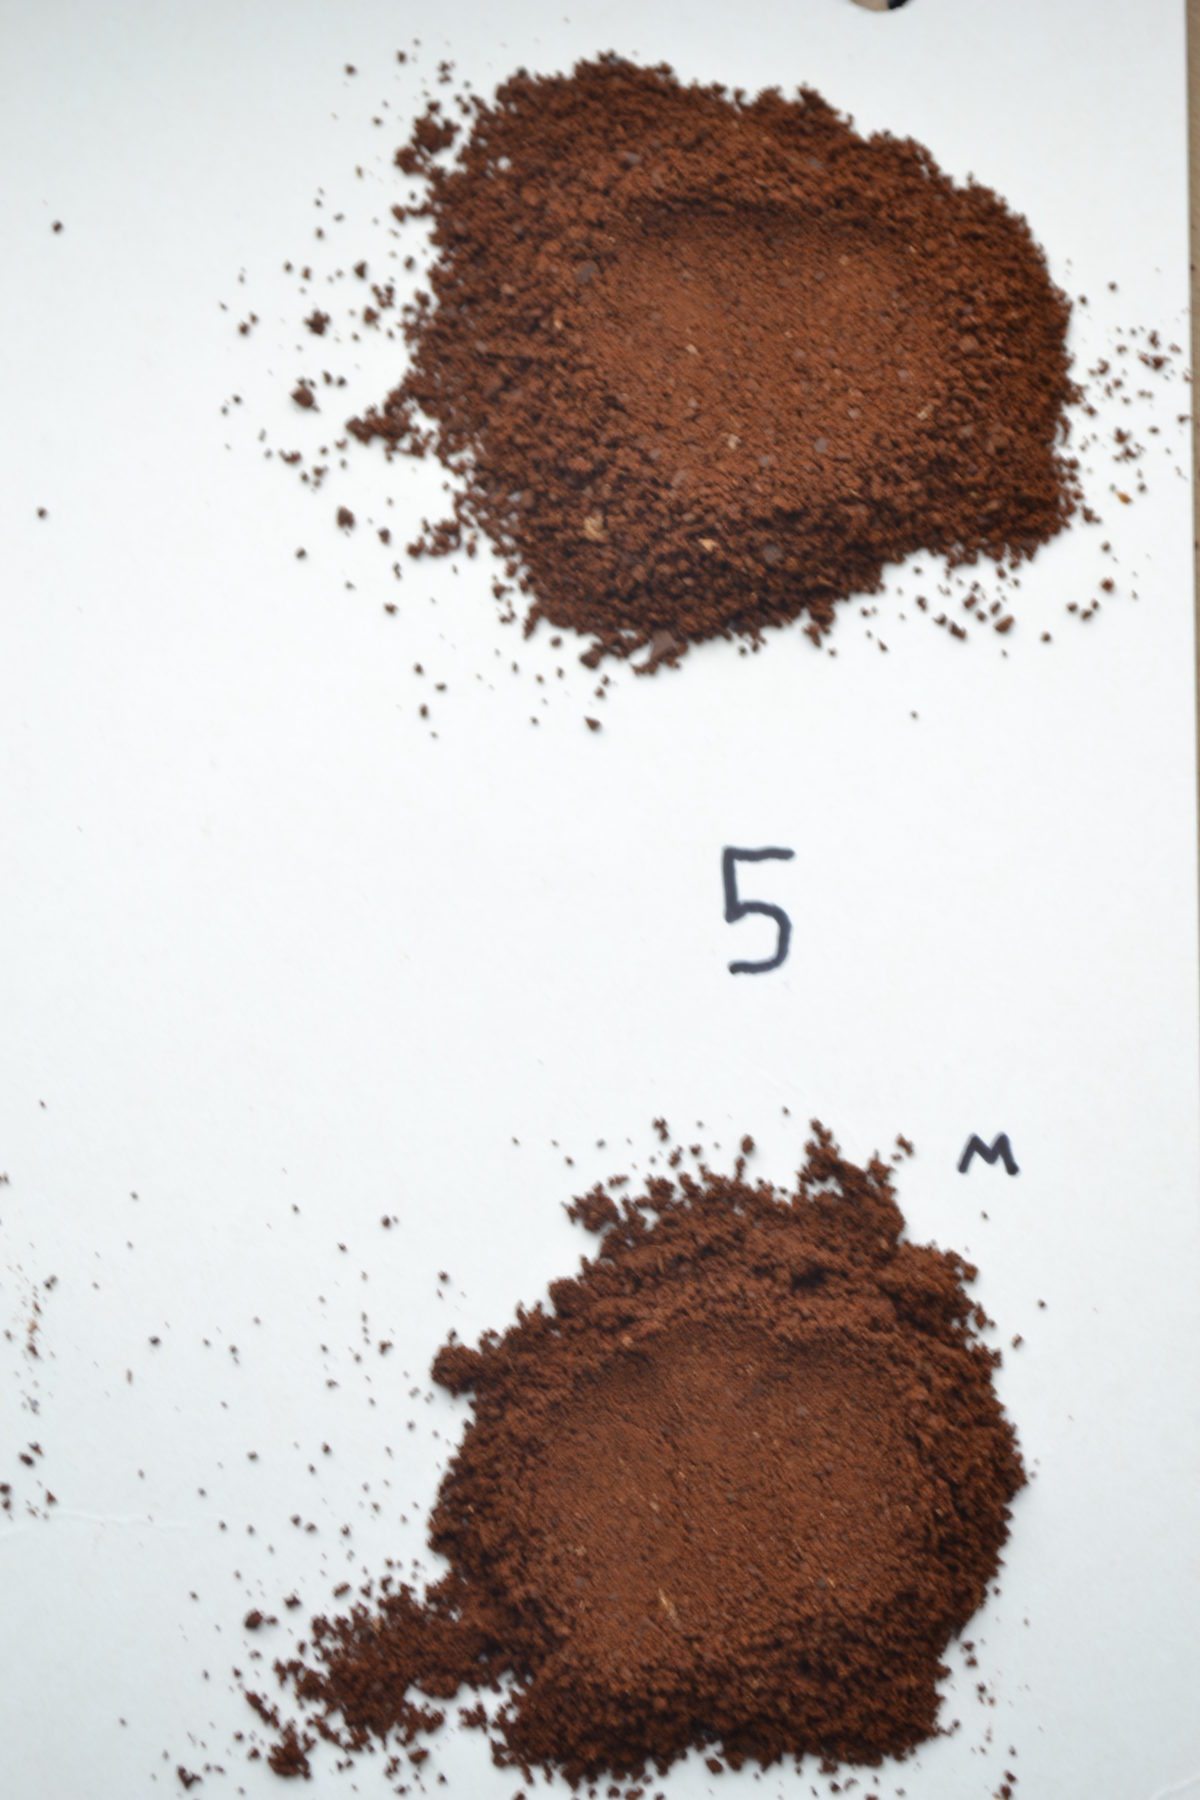
I found that the modification didn’t seem to change much at only 5 clicks.
With the burrs tightened to this degree, the modded components weren’t increased in efficiency, at least not that I could tell with the naked eye.
Grind Setting: 10 Clicks
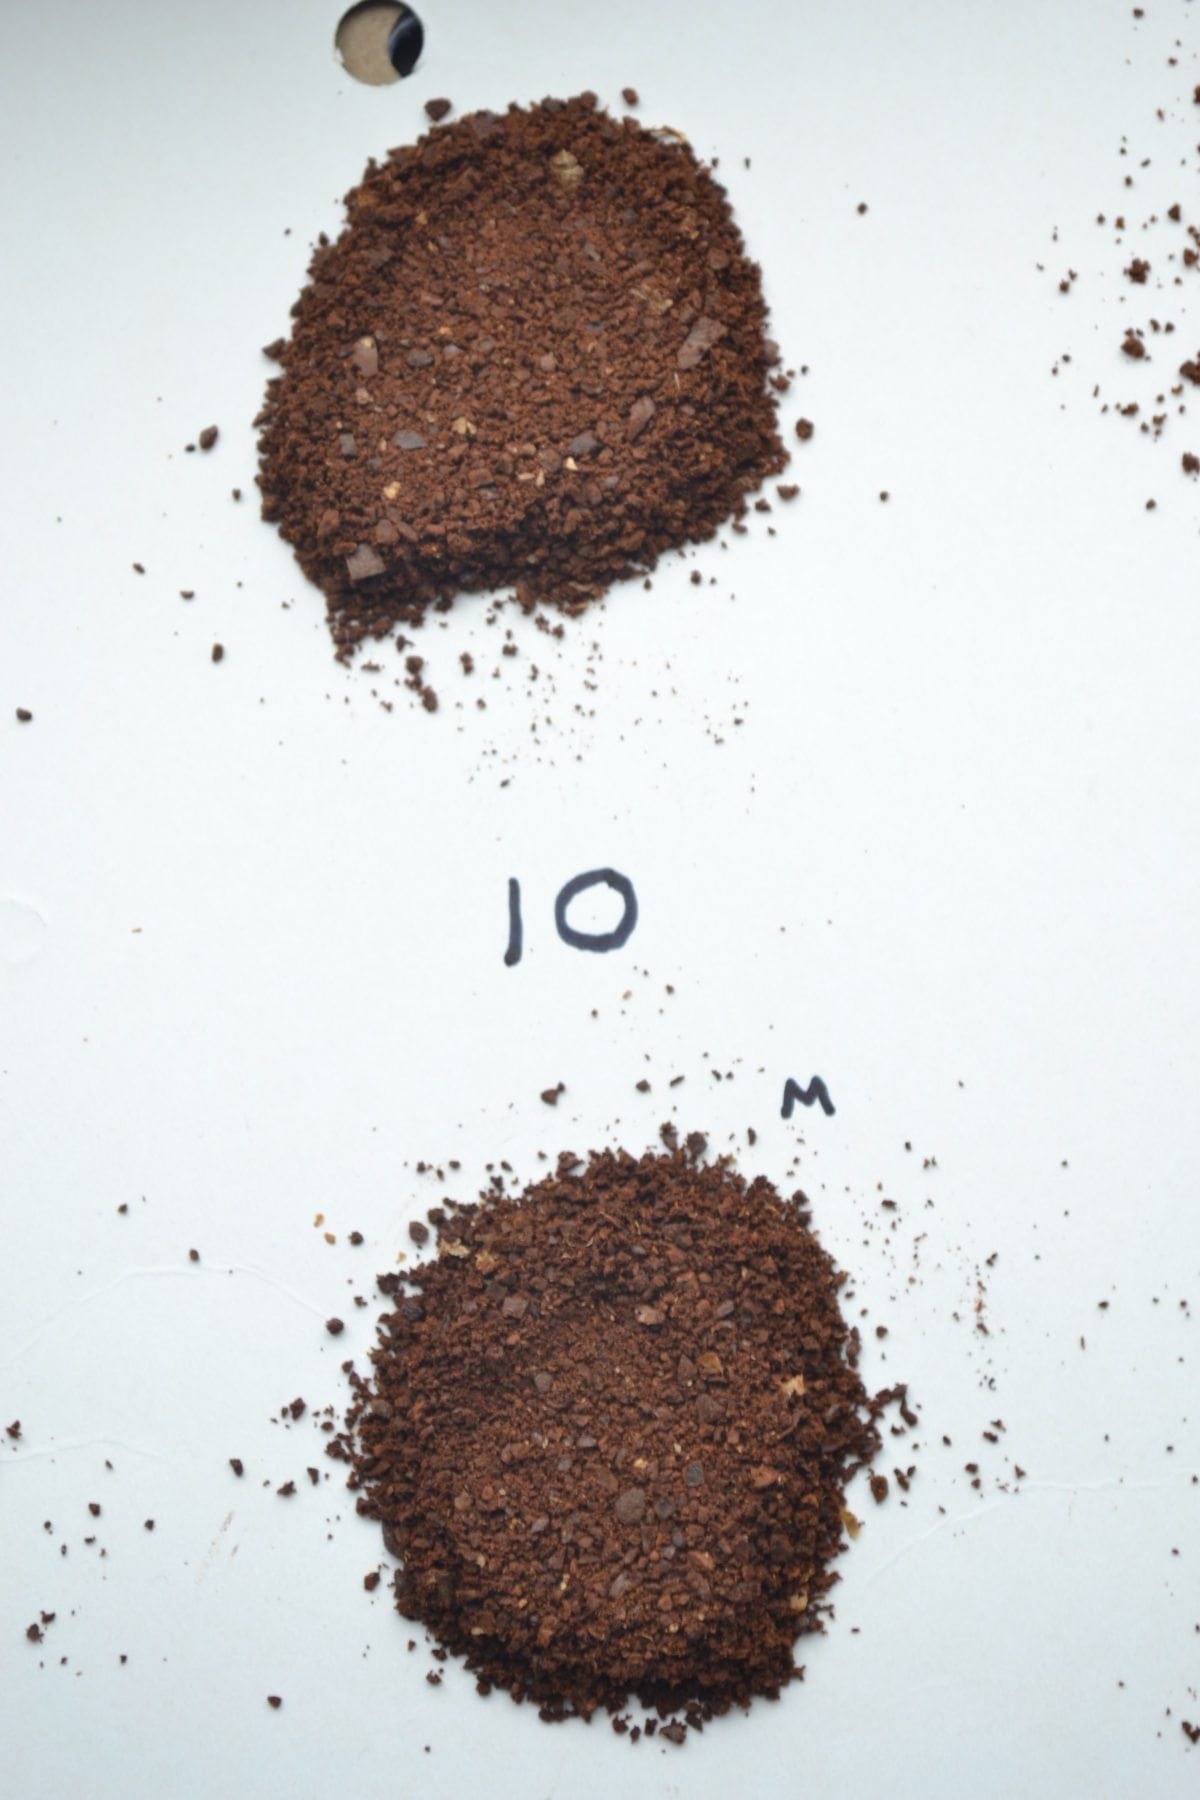
At 10 clicks, the effect of the tape modification was showing.
Before the mod, fines and boulders in the ground beans were both abundant. After the mod, both the fines and boulders are much closer to the intended size and less frequent, improving the overall grind uniformity.
Grind Setting: 15 Clicks

At 15 clicks, the modification is essential.
Without it, fines and boulders are everywhere, and grind uniformity is nowhere to be found. With the modification, this setting is actually usable, although probably too coarse for most brewing methods.
Additional Tips for a More Consistent Grind
I’ve discovered a couple extra things that help with grind uniformity when using the Mini Mill.
1. Use a Solid Surface When Grinding
It seems that using both arms to swing the grinder around to achieve a very quick grind is not ideal for consistency. Placing the grinder on a solid surface like a counter or table while grinding seems to be makes a noticeable difference, although it requires more effort.
For speed, swing like a madman.
For consistency, let gravity pull the beans down naturally.
2. Maintenance and Cleaning
Take care of your grinder, and it will take care of you.
This includes unwrapping the scotch tape and reapplying more after a quick cleaning. Resist the temptation to use water on the ceramic parts and invest in a toothbrush you can use on your coffee equipment to knock off fine particles.
If there are any stuck crumbs, you can use the tip of a butter knife to gently scrape them off.
Bottom Line on Improving the Grind Quality with this Mod
This mod shines at coarser settings, and is useful at finer ones. My test results were somewhat impacted by my grinder’s burr sharpness and the beans that I used. I am certain that newer and older devices will both be improved by implementing the mod.
Has anyone else conducted a similar test, have questions, tips or tricks? As always, if you know of any other tricks or ways of improving the daily grind, post in the comments!
Good luck, and happy brewing!


Thank you so much, this mod finally enabled me to brew the perfect cup of coffee.
One more suggestion as read in the coffeegeek forum: But some tape around the top part of the central shaft, so that the upper plastic ring sits stable as well.
I use it with the Clever Coffee Dripper, currently set to 7 cklicks, and it’s awesome.
That’s another great tip! For your Clever, how long do you let it steep before you release?
For the Clever, I use grind size of 10 clicks on the Hario Mini Mill. I start the draw down at 3 minutes, but if it’s a light roast, I do 3 minutes, 30 seconds. Hope this helps
My pourover taste improved greatly!!
Thank you so much. I use 8 clicks with the Hario V60 #2
That’s wonderful news to hear! Thanks for letting me know. I’ll give 8 clicks a shot soon. I normally have done 10.
Wow, 8 clicks would clog my V60-01 in no time… I’m surprised it has worked for you. I typically use 11 clicks from closed to achieved my desired brew time.
one question, will this interfere with grinding finely, like for espresso?
Based on my experience, this mod becomes more impactful as the grind becomes coarser. The really fine settings don’t see much benefit, but they’re not terrible to begin with.
Why no water? I don’t understand how water could hurt the ceramic pieces, and if I recall correctly the maker suggests cleaning with mild soap and water.
Have you guys used a drill with it?
I have not personally, although I do think I’ve seen others. Have you tried it? I’d be curious to find out how the Mini Mill holds up after repeated drill use.
Thank you so much for the post!
After disassembling and cleaning mine two times I found the outer burr wouldn’t stay where it belongs, the grounds became terribly inconsistant which terrified me. Glad that I found this post, now the problem is fixed =) Good work mate!
Hey, does this method work for Porlex Tall grinder??
I just bought a mini mill and modded it right away. The design hasn’t changed since you posted this mod, however I found that the wiggling was happening a bit differently. Here are my observations:
– The Rod:
In my mill the rod wiggles at the top of the “tunnel” not at the bottom.
The bottom part is apparently made of a piece of ceramic, and in my case it fits tightly to the rod, even one single layer of tape didn’t allow the rod to slide through it. So the mod, as it is described here didn’t work.
But the top part of the “tunnel” is made of plastic and doesn’t fit snuggly to the rod, that’s where the wiggling is happening on my mill. So I have put two layers of tape to the head of the rod, allowing the rod to slide through with a little bit of resistance. and now there is absolutely no wiggling.
– The Outer Burr
I have put two layers of tape as described and the outer burr now fits perfectly.
However when everything is put back together, and the mill is held vertically, the outer burr slides down from where it sits and closes the gap with the inner burr. If I reverse to have the burrs side up, the two burrs slide back down.
So the two burrs are allowed to move vertically quite a lot, from completely closed to open at the click setting.
And this appears to be by design, because there is nothing that holds the inner burr against the bottom and the outer burr against the top.
I’ll try to figure out how to make them stay in their place but currently this appears to be the biggest factor for grind inconsistency.
Anyone experiencing the same ?
I think I know what you’re saying about the burrs sliding. When you screw the clear base on it should be holding the outer burr in place. I just got mine today and I noticed that too until I put the base back on.